A few months back, I started a side project that I named unipipe. It is a visual tool to build flows and automate repetitive work. I had initially started with simple math functions like addition and squaring and could establish a generic structure for building on top of the basic functions.
UI/UX credits to Sreekar Pradyuman. The amazing team included Akshay, Rishabh, Sreekar, Jay and me.
I recently worked on unipipe again when I had pitched the idea at the annual hackathon at upGrad. This time, the project got a visual face-lift and also got a backend for executing custom scripts and firing APIs - thanks to the amazing team I worked with.
For the ones who are reading about unipipe for the first time, simply put, it is a flow executor. You can create flows by adding various blocks performing different things on the board and then connecting them to define the flow of data. Overall, the project's status looks as follows:
- Currently supported blocks - API, custom script in JavaScript, constant, several sinks including HTML renderer
- Proxy backend for firing APIs and executing custom scripts using Java's ScriptEngine (powered by Nashorn JS engine) and a switch to local execution using web-workers and eval.
- Ability (weak) to create new block templates
- Ability to save flows and reload them later
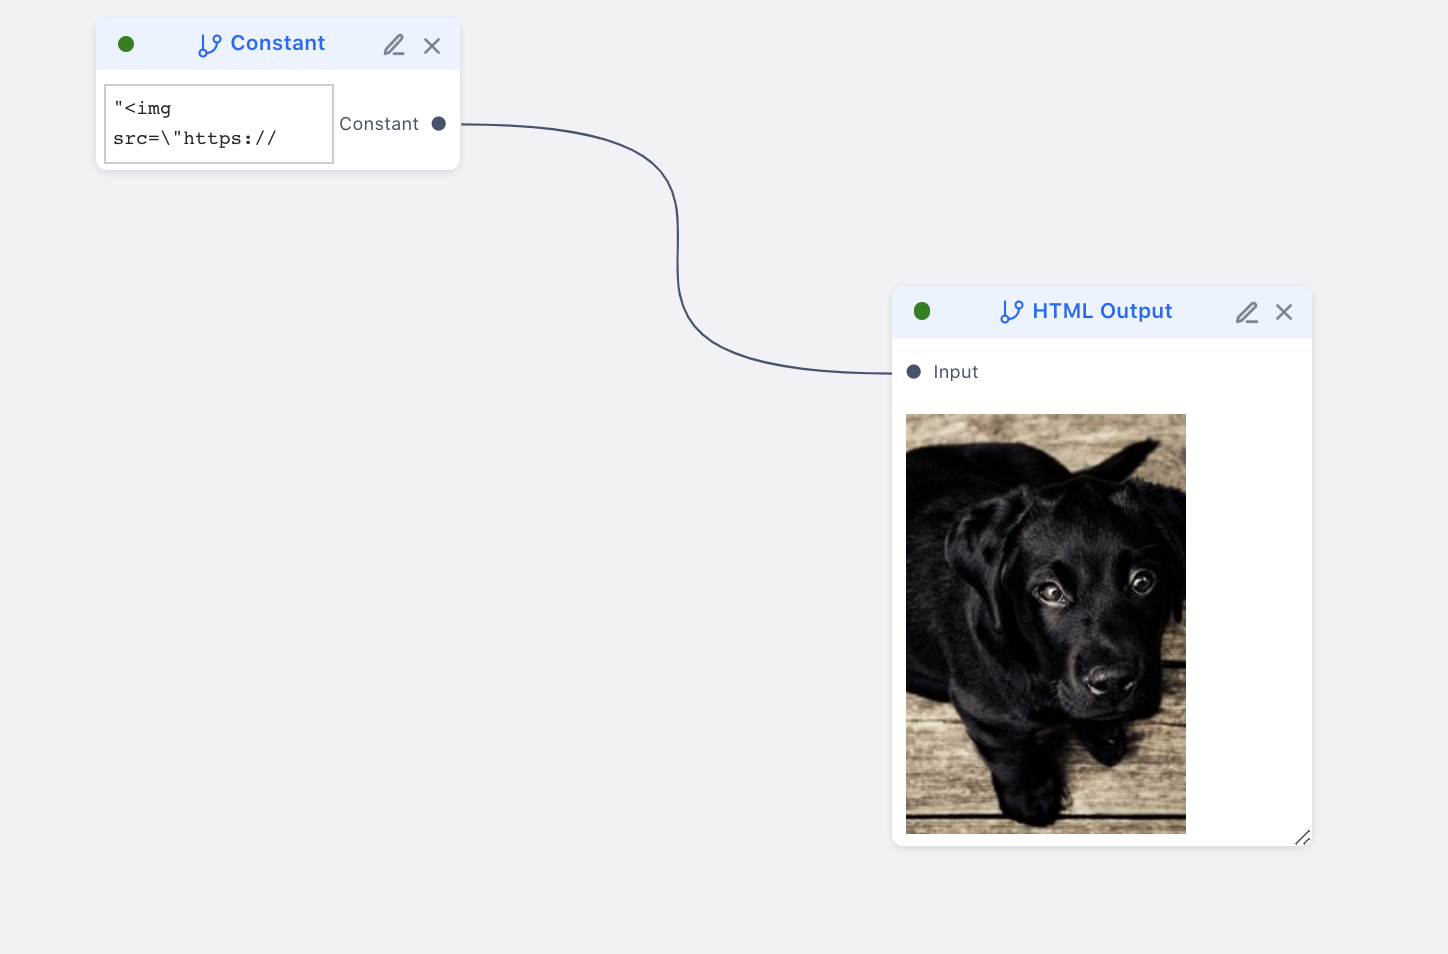
HTML Renderer in unipipe
The project can be broken down into three major parts:
- The Visual Builder: This is the UI layer that allows you to drag and drop blocks and draw lines connecting them. Each block has input and output pins and can be connected under some rules. This UI layer handles the visual representation of the flow graph and maintains the live data for all the connected blocks.
- The Executor: This is the topic of discussion for this post. This bit orchestrates the execution of blocks. It does not actually execute the blocks, it only decides what is executed when.
- The Execution Engine: This is where the block code actually runs. This can include a backend server, or the mighty eval function.
A bit about the executor #
I loved writing the executor for unipipe. If you think of it, what unipipe lets you draw on the board essentially forms a graph, where the blocks (specifically the pins) are the vertices and the connectors are the edges. Practically, you can connect blocks in any way possible, given you follow the input-output rules, i.e. an input cannot be plugged into another input, and an input cannot have more than one pin plugged in at a time.
In a trivial case, e.g. let's consider a use-case where you wish to see the response of an API using unipipe. To do this, you would add two blocks - API and display - on the board and connect API's output to display's input. When you execute this, the API block passes the response to the display block which shows it on the screen.
Now let's add another block in between the API and the display - a custom script. Let's say our API returns a list of users, and the custom script block maps this list of users to a list of users' names. The script code would look like this:
unipipe passes on data to next blocks as an input object which contains individual inputs with the name input{n}.
function handler(input) {
	let { input1 } = JSON.parse(input);
	return input1.map((user) => user.name);
}
Now when you make this flow and execute, the API response will flow into the custom script block, which will return the mapped list, and this will then be passed on to the display block. The flow looks simple, it is linear. The flow graph is simply a list in this case, and the execution is fairly simple.
A non-trivial example #
Let's consider an example where you have to combine data from two APIs and display it. E.g. https://jsonplaceholder.typicode.com/users/1 returns a user object, and our task is to print a single string with the name of both the users. In code, our approach would look something like this:
const total_price = await Promise.all([
	fetch('https://jsonplaceholder.typicode.com/users/1').then((res) => res.json()),
	fetch('https://jsonplaceholder.typicode.com/users/2').then((res) => res.json()),
]).then(([user_1, user_2]) => {
	return user_1.name + " & " user_2.name;
});
In unipipe, this would look like this:
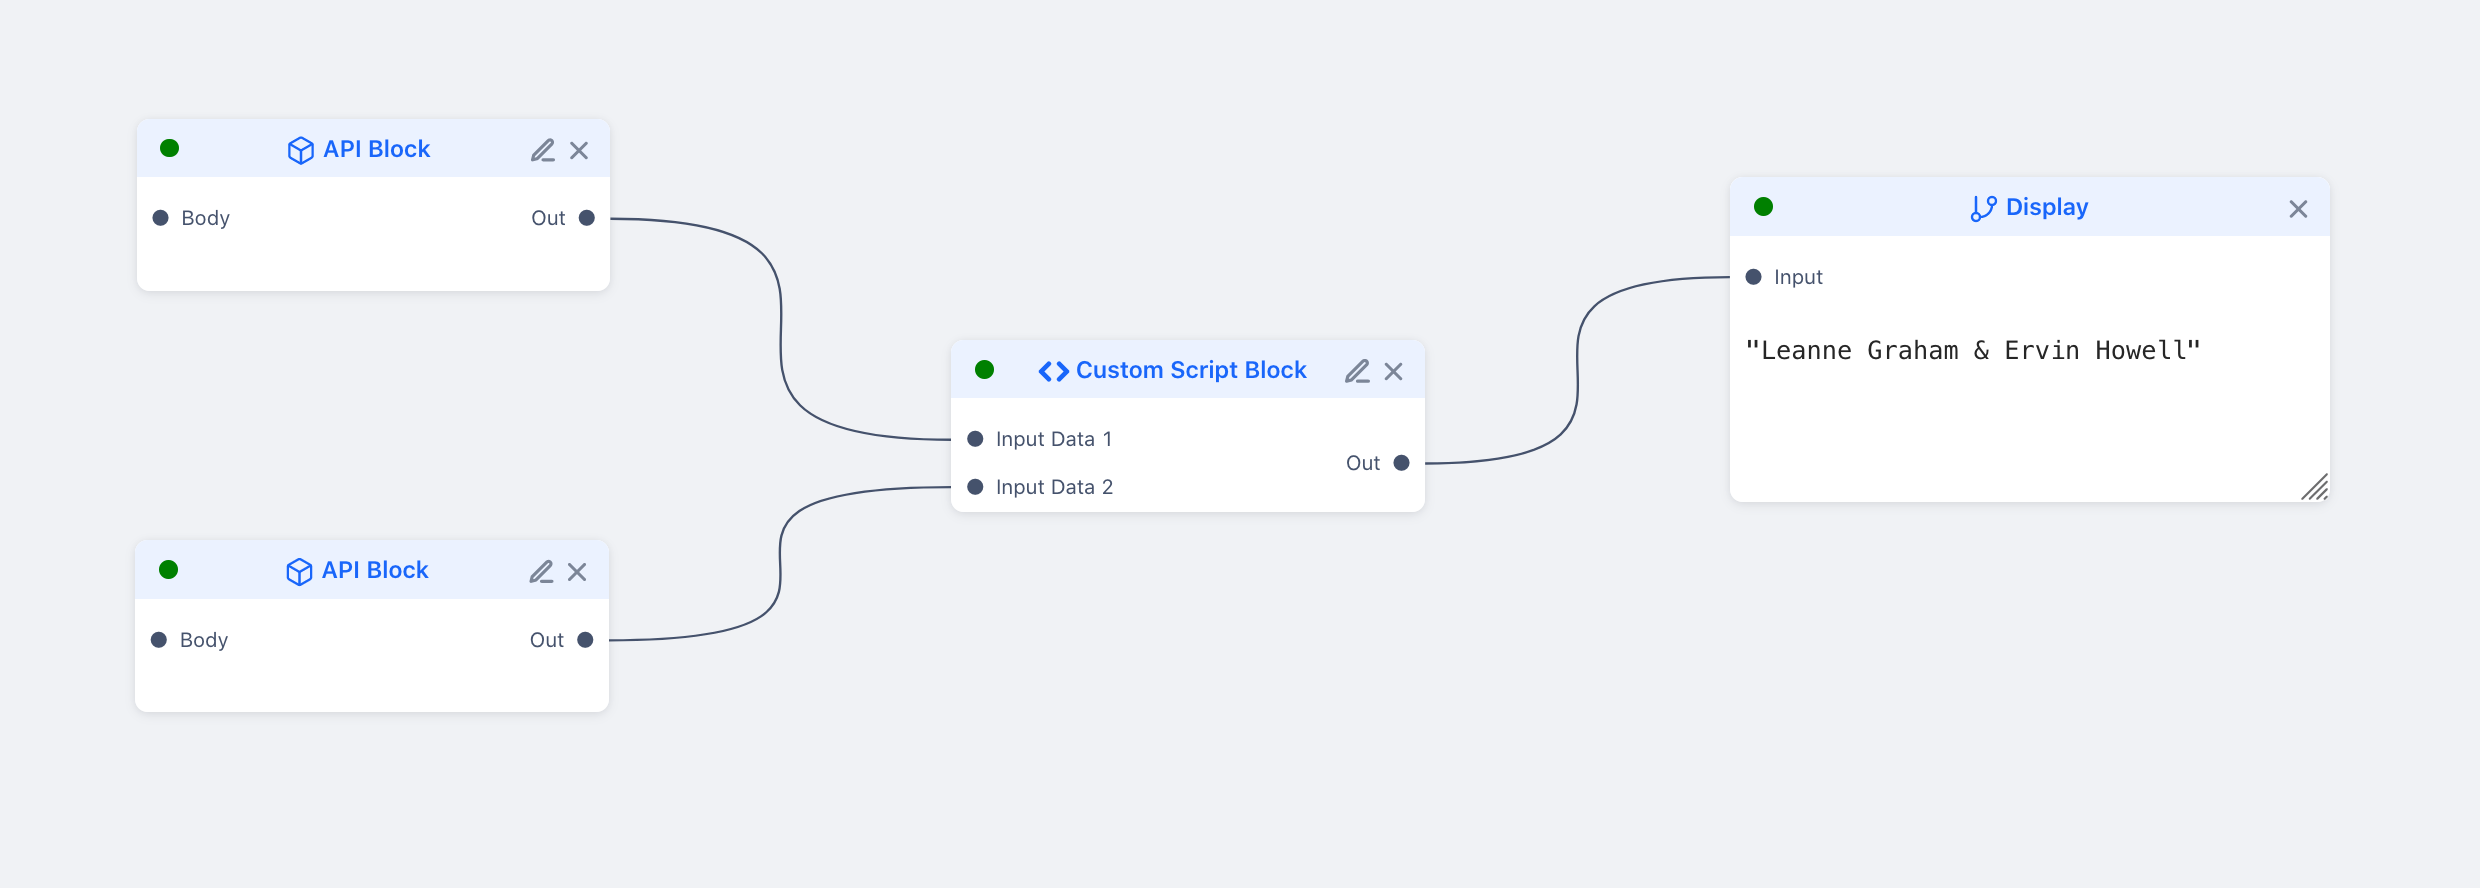
If you look at the graph, it is easy to identify what gets executed first, and in general, one can tell what block gets executed next. The two APIs need to complete for the custom script block to execute. Translating this execution logic to code is a bit tricky though.
Let me talk about how the executor works. When you click execute, the UI layer passes the current graph state to the executor function which operates in a worker thread. This is because at times, the execution might take up a considerable amount of processing power and it is better to keep it away from the rendering loop.
Once the executor worker receives the graph, it first finds out what the head node for the entire graph is. This is required to find out where to start executing. Let's consider we somehow find out which one is the head node. The next job would be to traverse through the graph and create instances of ExecutorNode. This is a class that represents a block on the graph and has certain functions that the executor would use later.
The two important functions for an ExecutorNode are getData() and execute(). Once all instances are created, the following happens recursively:
- For each of a node's inputs, trace back to the connected nodes and get their data using
getData()on their instances. - If this connected node itself depends on any other input, recursively get all such dependent inputs.
- Once the leaf node is reached, try getting its data using
getData(). If the node's data isnulland the node hasn't ever been executed before, then callexecute(). Add the calling node as a subscriber to this node's data. - In the meantime, there might be other nodes that might depend on the same node, keep adding such requests as subscribers.
- Once the execution is done, call all the waiting subscribers. For each node that has its data ready, execute all the connected output nodes in parallel until a sink is reached.
This can be summed up as fulfill all dependencies and then move ahead approach and it works perfectly. All inputs are fetched recursively, and all outputs are executed in parallel. This is how generally circuits behave.
One thing that I skipped over in the above discussion was how the head node was chosen. When I was implementing this I had stuck at this very point and it was causing a lot of frustration because I wanted a perfect thing ready. But finally, I had to sacrifice perfection and I used a very hacky method to solve this. The first node which was added to the board was by default assigned as the head node. This is very hacky, but it worked. At times you must solve things temporarily to reach larger goals. But, you must come back and fix it soon. And here I am, doing just that!
Finding the starting point #
Since we think linearly most of the time, the 'first' node approach works because we add those nodes to the board first. But to ensure definitiveness, a more predictable method is needed to figure out where to start executing the graph.
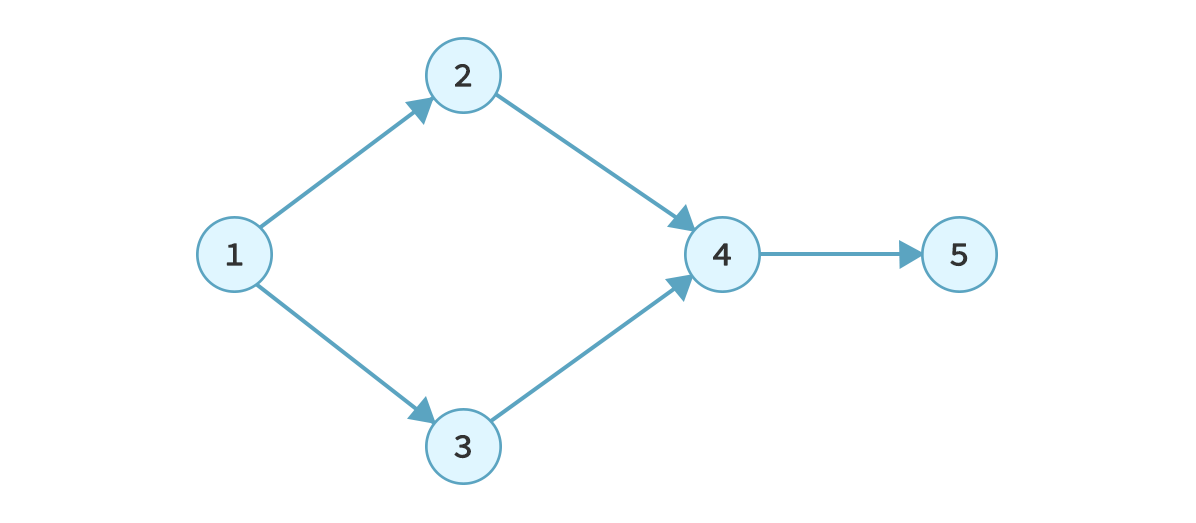
Recently, I have been doing Coursera's algorithms specialization. It is an amazing insight and brush up of the fundamental concepts. The second course is all about graph structures and ways to traverse them and other algorithms involving them. One special category of graphs is the directed acyclic graph (DAG). As the name suggests, it is a directed graph that does not contain any cycles.
A directed acyclic graph.
A lot of physical systems can be represented in the form of a DAG. One such class of systems is dependency graphs. When there are tasks that have to be performed in a particular order where one task depends on the output of others, the system can be represented as a DAG. This example looks a lot familiar! Indeed it is, unipipe is a flow executor, and the flow graph finally created is very similar to a dependency graph. Every node has a dependency on all of its input nodes and all its outputs depend on its execution.
We are getting closer to our solution one step at a time. One interesting property of DAGs is their topological ordering. It is obtained by placing the vertices of a DAG in an order such that if there's a directed edge (u, v), then u comes before v.
For the graph above, the topological ordering looks like this:
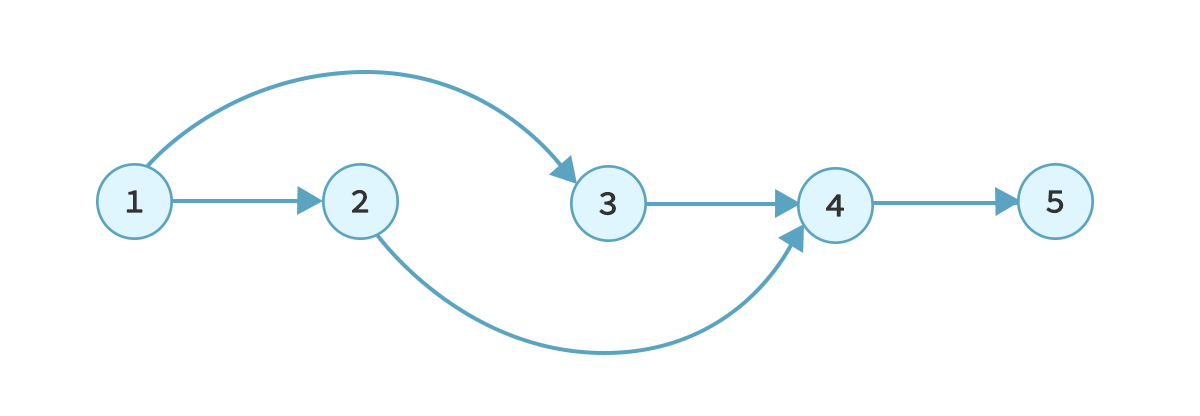
As it is evident from the definition and the diagram, topological ordering ensures fulfillment of dependencies of all vertices. This is exactly what is required in unipipe while executing nodes.
Kudos to Jasmin, who had written an awesome article on this in the context of webpack's module resolution. Before trying to resolve modules, webpack forms a graph of the dependencies of modules. Remember those import statements? Throughout your app, they form a large graph. Each time you import a module webpack has to ensure that all the imports in the imported module are fulfilled. Topological ordering comes to the rescue here too. Topologically sorting the module graph helps webpack know exactly the path to follow to fulfill all dependencies.
Implementing Topological Ordering for the flow graph #
The algorithm is explained very well in this lecture of the course on Coursera. Essentially, it uses depth-first search to recursively visit vertices and maintains a global index to track them according to decreasing order of incident edges. The algorithm ensures that the sink of the graph gets the highest label.
Pseudocode:
TopologicalSort(G):
	Mark all nodes as unvisited
	f = {}
	current_label = n (n = number of vertices)
	for each vertex v belonging to G:
		if v not visited yet:
			DFS(G, v)
Here, DFS is a modified version of depth-first search which saves the current_label at each finish of the DFS call and decrements it for the next one.
DFS(G, v):
	Regular dfs
	.
	.
	f[v] = current_label
	current_label--
I had implemented this algorithm in JavaScript, but for unipipe, instead of re-inventing the wheel, I'll just use the package toposort. Topological ordering for the flow graph can be obtained using this algorithm and the original recursive + iterative algorithm can then simply be converted to an iterative one over the order obtained from the sort.
Executing in the order of topology ensures that all dependency nodes are executed first and removes the need for the 'subscribers' logic. No node would have to now wait for the previous output as it would be already present. But again, to make it asynchronous, we will need subscribers, or the output nodes would be executed sequentially when they can potentially be run in parallel.
The unipipe project is open for contributions and I am going to give some amount of time regularly for this. The aim of the project is to experiment with this domain of flow execution and explore new areas of computer science. As 2021 begins, my goal would be to work on a few but long-term projects. I have a few other ideas in the pipeline and will write about them here soon. I wish all of you a happy new year!
I'm also trying out a newsletter, there's currently no set agenda for this, but if you liked this article they maybe you'd want updates whenever I write something similar. You can subscribe to it using the form below or read more here: Subscribe to the newsletter.


